The Bottle Units are a reef restoration tool utilized by all Conservations Diver Training centers, and originally developed in 2009 at our center on Koh Tao, Thailand, the New Heaven Reef Conservation Center. The units were originally developed by two of our students, James and Ames, and have been tested and refined over the years since. This cost-effective method at reef restoration is easy to build and deploy, and is highly effective at increase the available substrate for transplanting corals when restoring reef areas or creating new structure to extend the reef area and establish alternative dive training locations.
To download the PDF version of this article, click here
Objectives/Purpose
The Bottle units are well suited for adding stable growing structure for the transplantation of both nursery-raised and so called “corals of opportunity,” in the process of restoring coral reefs. The units are especially applicable in areas that have experienced anchor damage, dynamite fishing, boat groundings, and other acute forms of structural damage. By being simple to build and easy to deploy, the units lend themselves to easy scalability and widespread use. They use materials that are cheap and easy to source anywhere in the world, and can be quickly constructed and deployed as a rapid response measure following disturbances to reef health.
The units are heavy enough to provide a secure transplant location for coral feedstocks, but are still light enough to deploy using only basic SCUBA and marine conservation equipment. After deployment, the units raise the transplanted corals to a height up to 50 cm from the bottom, allowing them respite from many threats, and providing them with ideal growing conditions. The units are structurally complex, creating habitat for many other organisms which are essential for restoring the ecosystem, rather than just increasing the coral abundance.
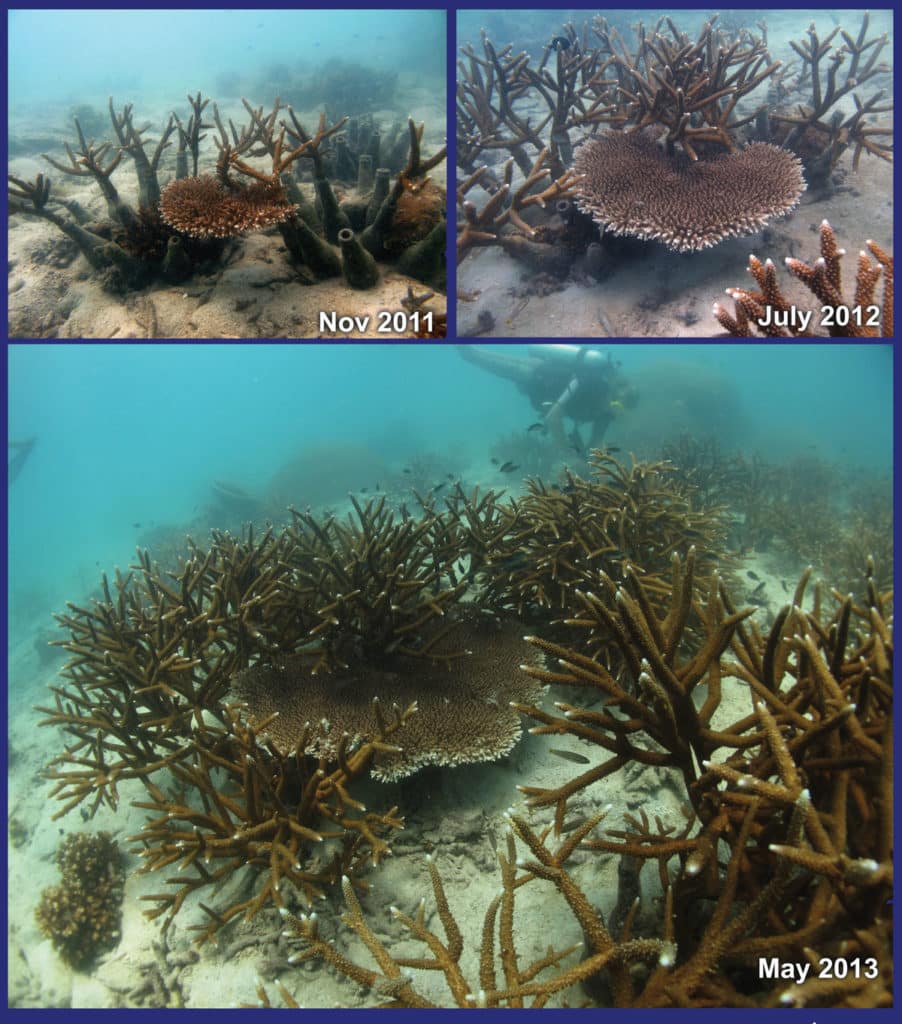
The units will last several decades, and are generally covered in corals relatively quickly. The materials used are non-toxic, and conducive to coral growth. In many island settings where glass bottle waste is a problem, they are also a form of repurposing. Because of the simplicity and artistic freedom available in construction, they are a desirable method for programs that are concurrently attempting to involve local community members, stakeholders, or groups of students. Since they can be constructed in one day and easily personalized, they make a good project for fundraisers and awareness raising events. Furthermore, because transplantation is standardized, large teams of volunteers can effectively be used in the underwater restoration programs.

Materials Required
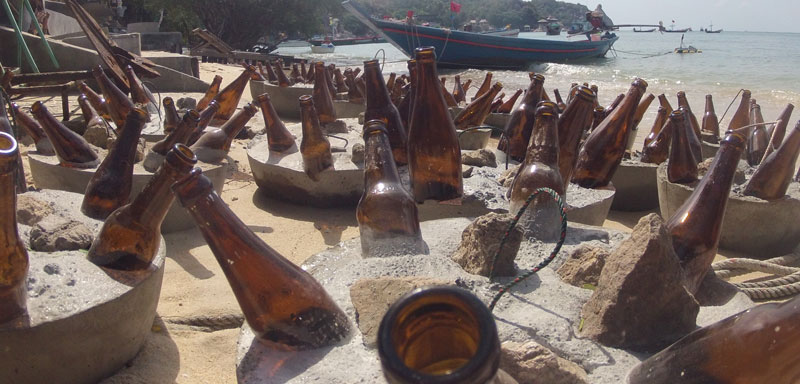
- A Large Plastic Tub (such as those used for hand-washing laundry) which is about 30-50 cm in Diameter and at least 15-30 cm tall
- Metal rebar
- Concrete Mix
- Rocks/concrete aggregate
- Sand
- Empty glass bottles (with labels removed)
- Spray bottle with cooking oil or sugar water
- Shells and Pieces of coral rubble (optional) collected from the land, not the sea
Construction Procedure
- Clean all glass bottles, removing labels and anything which could be considered litter or may harm marine life.
- Spray the cooking oil or sugar water into the tubs
that will act as the mold for the concrete depending on availability and desired
final texture
- Cooking oil will help to release the concrete after it sets, but will leave a smooth texture to the concrete
- Sugar water will also help the concrete to release from the mold, but will leave a higher rugosity to the concrete surface
- Mix the concrete using the 1:2:3 rule (1 part water, 2 parts concrete, 3 parts sand) mixing the sand and concrete through before adding the water
- Mix in the rocks
- Put a metal rebar ring inside each tub for added weight and strength (If rebar is not availble, use binding wire)
- Fill the tubs with concrete to the desired level
- Insert 4-6 glass bottle into the concrete, filling them with water first so they sink into the concrete
- Add any rubble/shells to the top for added texture and recruitment points
- You may also choose to add a loop of rope if you expect to be using life bags under water for aid in deployment
- Allow the cement to cure overnight, remove the units from the mold and leave for another 12-24 hours before deployment.
How to use the Bottle Units
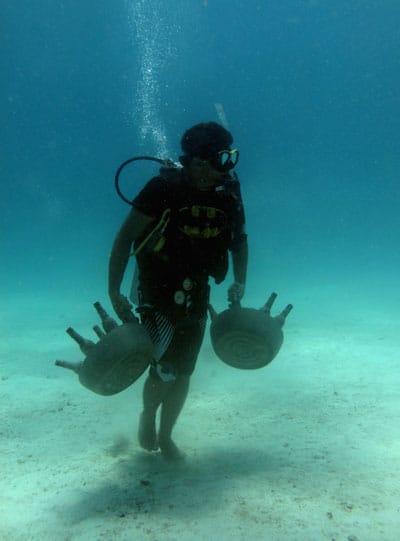
After the Bottle units have been constructed and given time to cure, they can easily be deployed to the reef using standard dive and snorkel touring boats. Each unit should be light enough to be carried by one person to the boat, where they can be stacked carefully for transport. Ensure that no bottles are broken and that if they are, all team members are notified and measures are taken to ensure nobody can be cut by the broken glass.
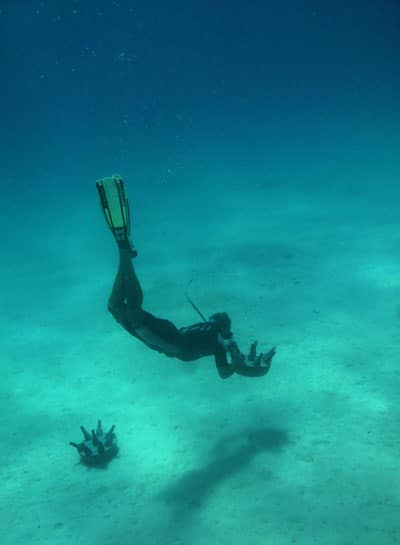
Once at the site, the bottle units can be lowered using ropes or dropped with the assistance of free divers, who will control the descent and ensure the units end up in the desired location. If it is necessary to move the units once on the bottom, we recommend one of two techniques. The first technique used in coral reef areas is to use a lift bag to achieve near-neutral buoyancy, and then a team of two divers can lift and swim the unit into place. Divers should never use their BCD’s to lift any objects underwater. The second method, used in areas with entirely sandy bottoms, is for the divers to remove their fins and walk the units into place, this is the easiest and fastest method but should never be used in areas where the benthos will be disturbed or harmed in the process.
Once the units are in their final position, divers should twist and shake them to allow them to settle slightly into the sand or rubble, this will prevent them from moving around in any large waves or currents. Next, corals can easily be transplanted to the units using marine epoxy. The units are designed to accept both corals from the table nurseries (in which the vinyl tubes are the same diameter as the bottle mouths), and corals of opportunity from the reef. Corals of opportunity are coral fragments that have been created naturally due to fish feeding, waves, and storms but may also be from human-caused disturbances such as diver contact, anchors, boat groundings, or fishing. If these fragments are larger than 10 cm, then it may be best to transfer them directly to the bottle units instead of the nurseries.
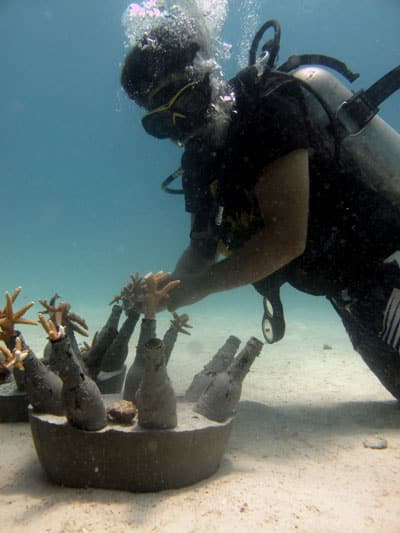
Place the coral fragment into the mouth of the bottles or within the matrix of bottles and coral rubble at the surface of the unit, and secure it with a small amount of underwater epoxy. The corals will grow quickly on the inert glass bottles or the dead coral/shells and should colonize the units quite rapidly.
Troubleshooting
The most common problems we have seen with this technique over the years are:
- Making the units too small – If the units are too small, then they are likely to be turned over or displaced during large storms and will not provide a secure location for coral transplanting
- Making units too light – Concrete losses about 40% of its weight in water. If rocks are not added to the concrete, then it will be too light and can be displaced in storms, potentially causing more damage to the existing reef
- Units are not strong enough and crack or break– the units may crack and break if the concrete is not mixed in the correct proportions, is not given enough time to cure, or is not reinforced with metal rebar or wire
- Units sink into the sand – the units are not designed for very soft sediment areas or sandy areas that have strong hydrological action; using them in such places might prove futile as they are denser then the surrounding substrate and will tend to sink over time.
A note from Conservation Diver
We hope that you experiment with this technique and that it proves valuable to your program. Remember that coral restoration is a process that should only be undertaken by those who have had training in the techniques and thoroughly understand and are familiar with the reef they are working in. Every coral restoration technique is different, and some will be more or less successful in different areas at different times. Please let us know what you think about this technique by emailing us at info@conservationdiver.com.