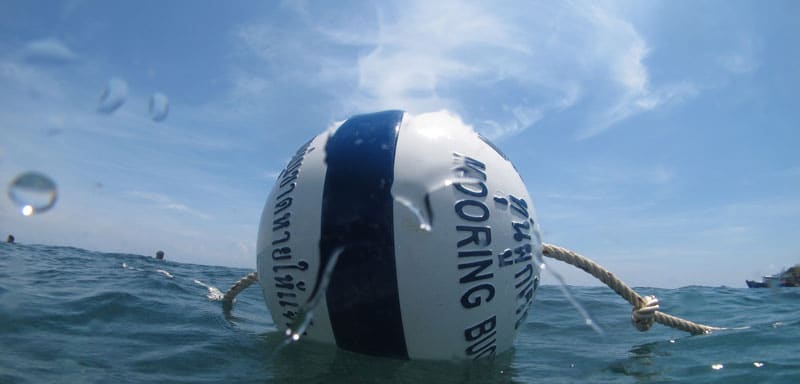
Mooring lines are essential to save coral reefs from damage caused by anchors and boats. Mooring lines can be installed in any areas where boats visit frequently and allow those boats to securely moor up next to a reef rather than dropping an anchor on top of it.
This is critical to protecting reefs, especially in areas of heavy tourism, as a single anchor dropping can destroy decades of coral growth. So, installing and maintaining mooring lines is one of the more important things one can do to protect the future of our reefs, but how many people know how to do it properly?
There are as many ways to make a mooring line as there are people doing it, but here we will present you with the best practices which we have developed over the years. Through our training program, we have installed or repaired hundreds of mooring buoys, all while giving others the knowledge and skills to continue this effort worldwide.
Finding a suitable location to install a mooring
The first step to installing a mooring line is to find where you want it to go. This may include many considerations such as:
- Proximity to the reef for snorkelers and divers
- Seasonal patterns of waves and storms
- Seabed bottom type
- Availability of existing non-living substrates such as large boulders and rocks
Sometimes it is hard to find a suitable location near the reef, as there may not be any natural (non-living) rocks and boulders to attach to. Mooring lines should never be attached to living corals, no matter how large they are, as the ropes can abrade the coral surface as current directions change throughout the year. Furthermore, even though you may design the mooring lines for small boats, very large ones may tie into it, or multiple boats may attach during storms.
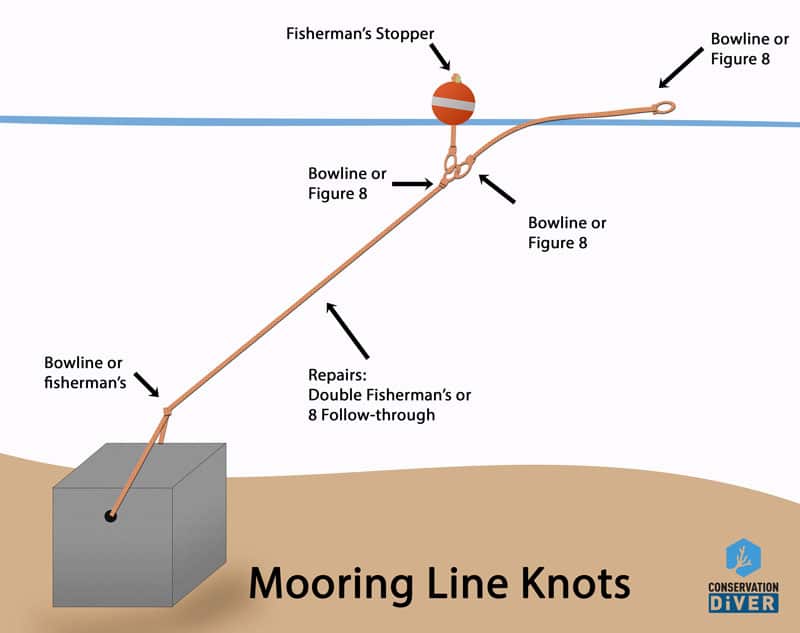
The parts of the mooring line
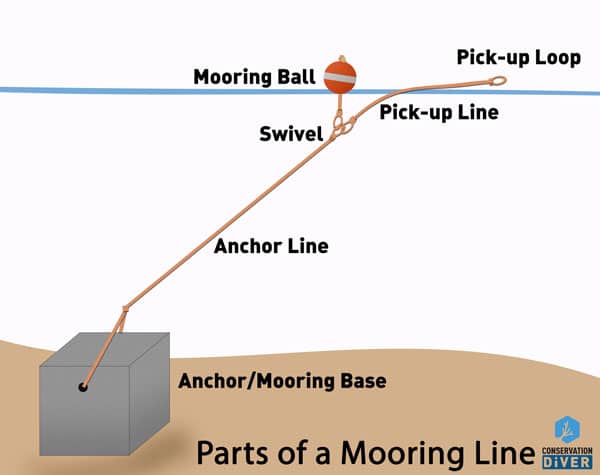
A mooring line is composed of multiple sections, as shown in the right figure. It is better to construct the mooring line this way, as when it is done as one continuous line and breaks, the whole thing is lost. Using this design means that the weakest part (the pick-up line) is where it will break, and you do not lose the mooring ball (often the most expensive part), and it is easy to locate and repair. The parts of the mooring line are:
• The anchor
• The anchor line
• The swivel
• The ball line
• The pick-up line
• The mooring ball
• The pick-up indicator ball
• The pick-up loop
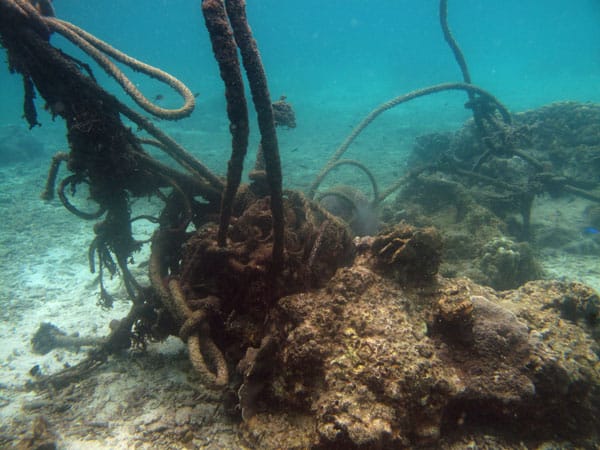
Installing Artificial Anchors to Make Mooring Lines
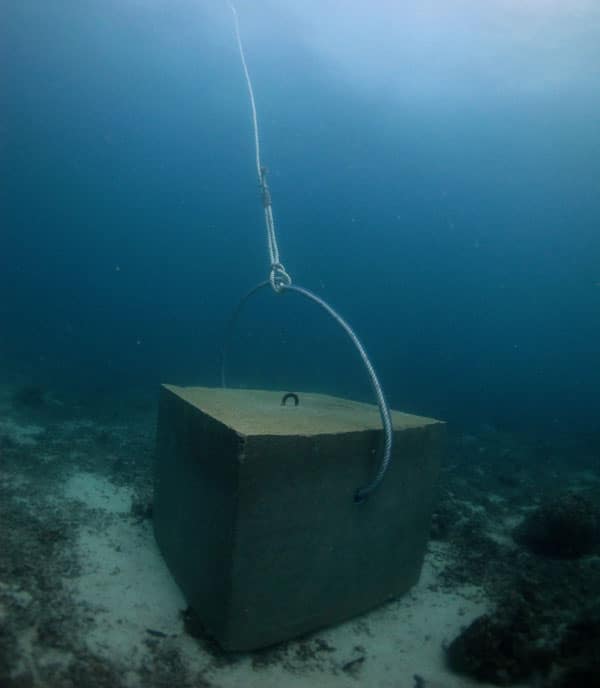
Oftentimes, there are no suitable anchors already existing under the sea for mooring line installations, in which case artificial ones must be created and deployed to the area. These range in design from simple concrete blocks which are dropped by a barge to more complex modular units that can be built in place.
There are also sand screws (such as the Helix screws) that can be used in sandy areas, but in our program, we have found them to be very difficult and expensive to install and have a shorter life span than concrete ones.
The anchors should be very heavy, at least 5-6 tons on land. We have found that having holes through the blocks is better than using metal loops to tie to, as the holes will last as long as the blocks and never corrode, break, or become deformed.
Occasionally, the holes can become fouled and clogged by marine organisms, but it is usually not too much work to clear them. Small mooring anchors made of multiple parts are generally not recommended as they tend to move during large storms or when multiple boats tie to them and can actually cause more problems to the reef.
The Mooring Anchor Line
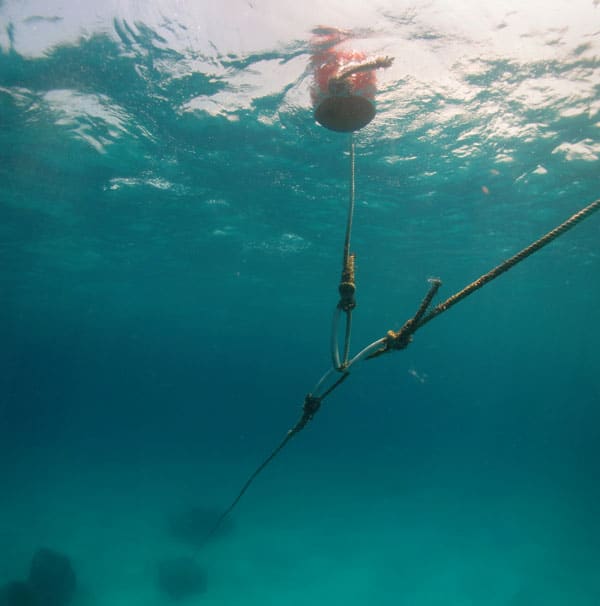
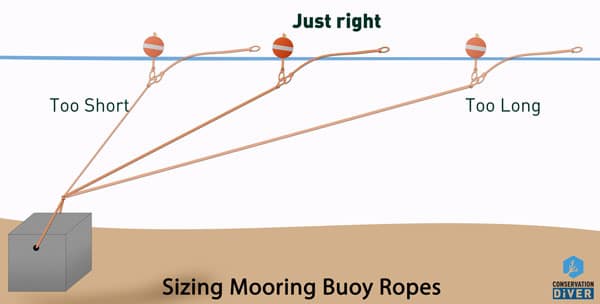
The anchor line should be the strongest part of the mooring line, so usually, it is made using a thicker diameter rope or two ropes in parallel. The anchor line runs from the anchor to the swivel loop, just a few meters under the water surface.
The anchor line should be made long enough to run at about a 35-40° Angle towards the surface. If it is too short, then it is more likely to break under tension, and if it is too long, it may become entangled at the surface or risk being run over by a boat at night.
The Swivel Loop
The swivel loop is not actually a swivel but a place to attach the other parts of the mooring line. Most often, the loop should be reinforced using thick vinyl tubing to protect against abrasion and wear. This loop should be very strong and should be under the water when the mooring line Is not in use.
The Mooring Ball Line
The ball line is used solely to attach the mooring ball to the anchor line, and should never be integrated with the pick-up line, as is often done by beginners.
The reason is that the ball is likely to abrade and wear the anchor line during use and then will be lost when that line breaks. As the balls are very expensive, this line should be made strong and not designed for any boats to attach to. That way, when the pick-up line is broken (which is a guarantee over the life of the mooring), then the ball will still be there, marking the location of the mooring and allowing for fast and easy repairs.
The Pick-up Line
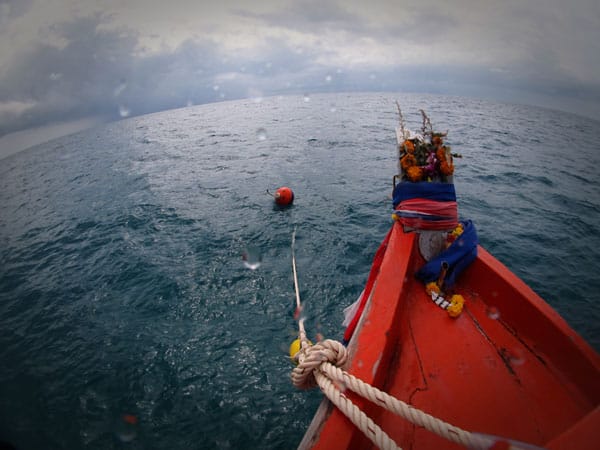
The pick-up line is usually about 4-6m long and rests on the water’s surface when not used. The line Is usually marked with a small float so that it is obvious and facilitates the boat captain to easily pull up to it and grab it.
Boats should not use the pick-up line directly to attach to but should instead extend the line using the rope on their own boat, making the mooring line more secure and less likely to break with larger boats, multiple boats, or during storms. Like the swivel line, the loops on the pick-up line are ideally reinforced with vinyl tubing to protect them from normal wear and tear.
Knots to Repair or Make Mooring Lines
One of the most important things to learn about when installing mooring lines (other than proper anchor selection/installation) is knots. They can be a bit daunting for the uninitiated, but give them some practice, and over time you will find they are pretty straightforward and very useful in everyday life.
There are 5 knots used for setting up mooring lines, and they are generally part of a class of knots called dynamic knots, meaning that they adjust or flex with the rope and do not reduce the rope’s integrity.
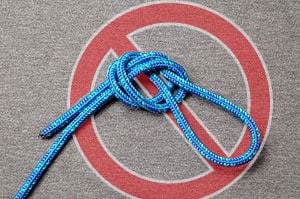
The opposite of a dynamic knot is known as a static knot, these knots tend to only tighten with the rope and never release the tension they store. You will already be familiar with these knots as they are the ones you can never get undone once they are tied. The most common static knot is the overhand knot, which is also the simplest.
When an overhand knot is tied into a rope, it creates a pinch-point and does not allow energy to be absorbed along the length of the rope, thus when the rope breaks, it will generally do so right at this knot. For this reason, we never use the overhand knot or other static knots when constructing or repairing mooring lines.
The knots we do use include:
• The Bowline
• The Fisherman’s and Double Fisherman’s
• Figure 8
• The Figure 8/Bowline on a bight
• Half/Whole Hitches
You should be familiar with and practice all of the knots with multiple rope types because when you are in the water and are dealing with a rope that is 30mm in diameter or more, this can be pretty difficult even for experienced knot tie-ers.
The Bowline Knot
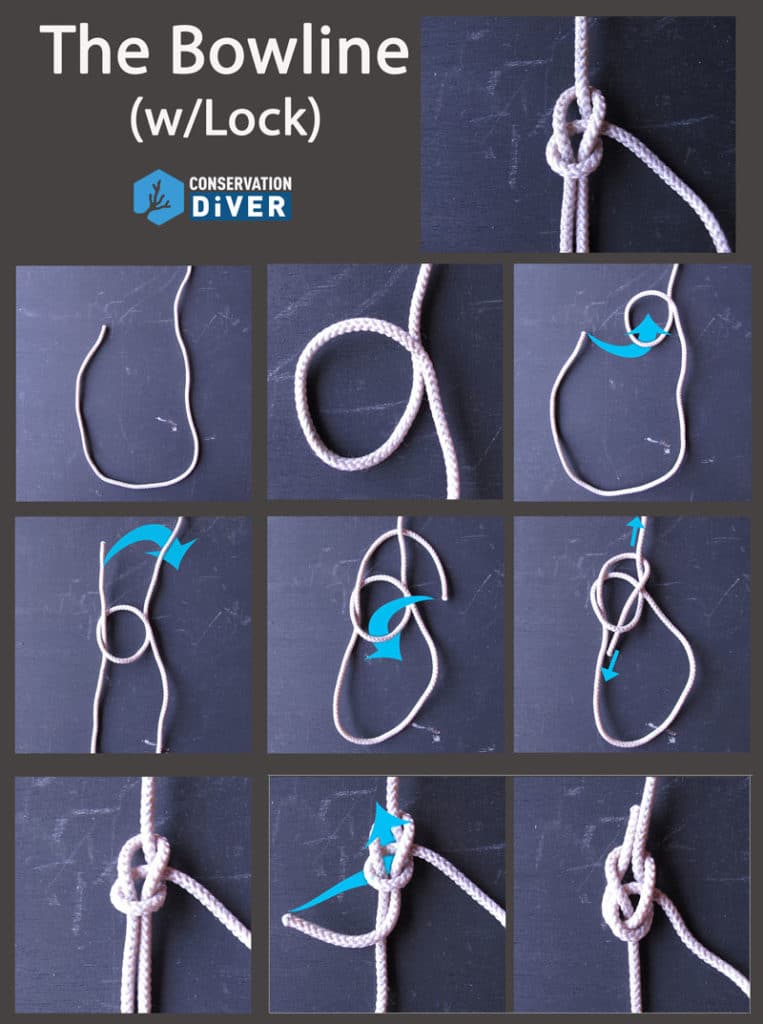
The Bowline is probably one of the most essential knots you can learn, whether it be for diving, climbing, sailing, or any other outdoor activity.
It is a knot that is easy to tie, uses very little rope, is nearly unbreakable, and is also easy to untie, no matter how much force has been applied to it.
In mooring line construction and repair, this knot is generally used in the following applications
- Attaching the anchor line to the anchor point
- Creating the swivel loop
- Attaching the ball line of the pick-up line to the swivel loop
- Creating loops in the rope for other purposes
It seems like a complicated knot to master, but once you do, it becomes quite intuitive and both quick and easy to tie or untie. Be sure to check the knot before swimming away, as it is also one of the easier knots to tie wrongly, which will come untied.
The Fisherman’s Knot
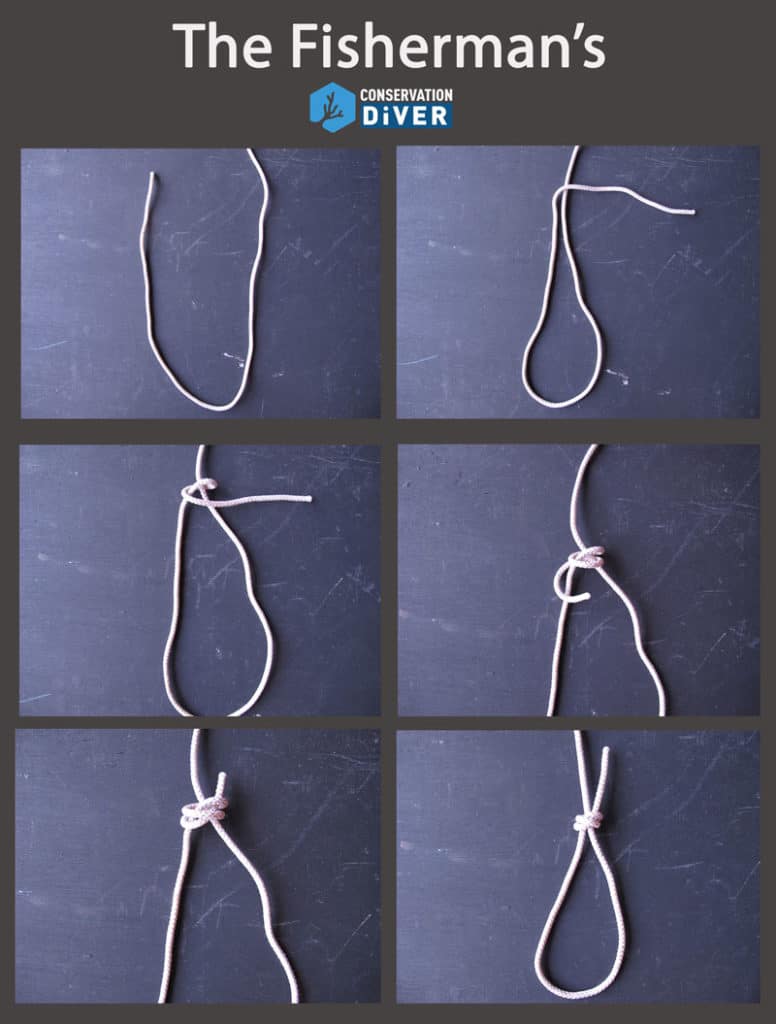
This is a great knot that can be used in a wide variety of situations when you need a secure dynamic knot that will not come undone.
Unlike the Bowline, this is generally a permanent knot, meaning that after tension is put on it, you will not be able to get it undone. However, it does not reduce the rope’s integrity or interfere with energy absorption.
The normal fisherman knot can be used to attach the anchor line to an anchor point, especially if you need a ‘slip-knot’ that will tighten around the object as force is put on it. It can also be tied around itself to create a stopper knot to secure the mooring ball to the ball line or prevent a rope from fraying or unraveling.
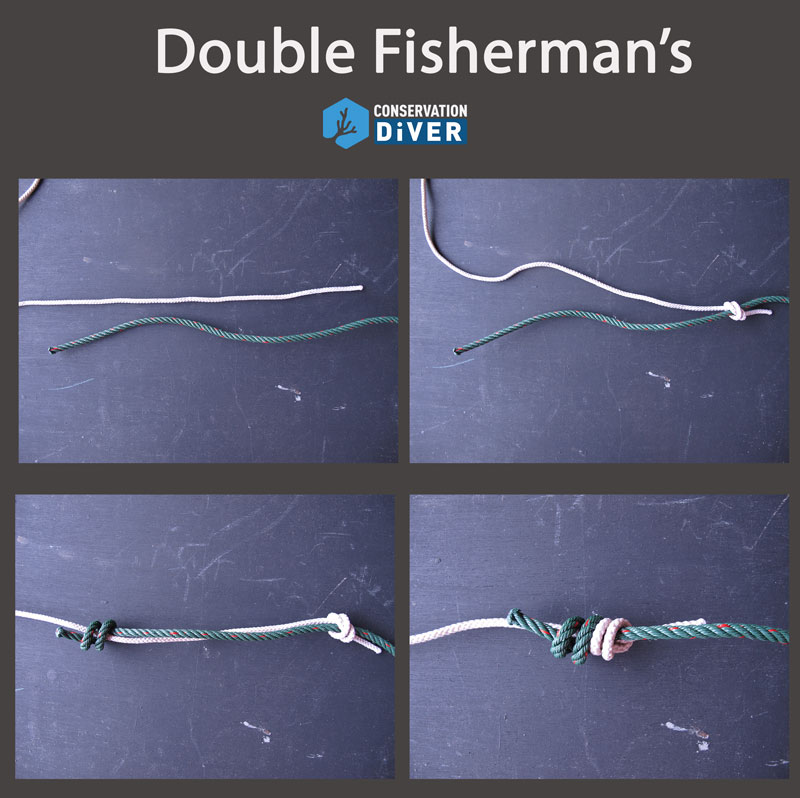
This knot can also be tied in what is called a Double Fisherman’s, which is the best way to attach two ropes together when they are of different sizes or materials. Even very large ropes can be attached to very small ones quite securely, and with using little rope for the knot. This is the knot to use in cases where you are repairing or extending an existing rope.
The Figure 8 Knot
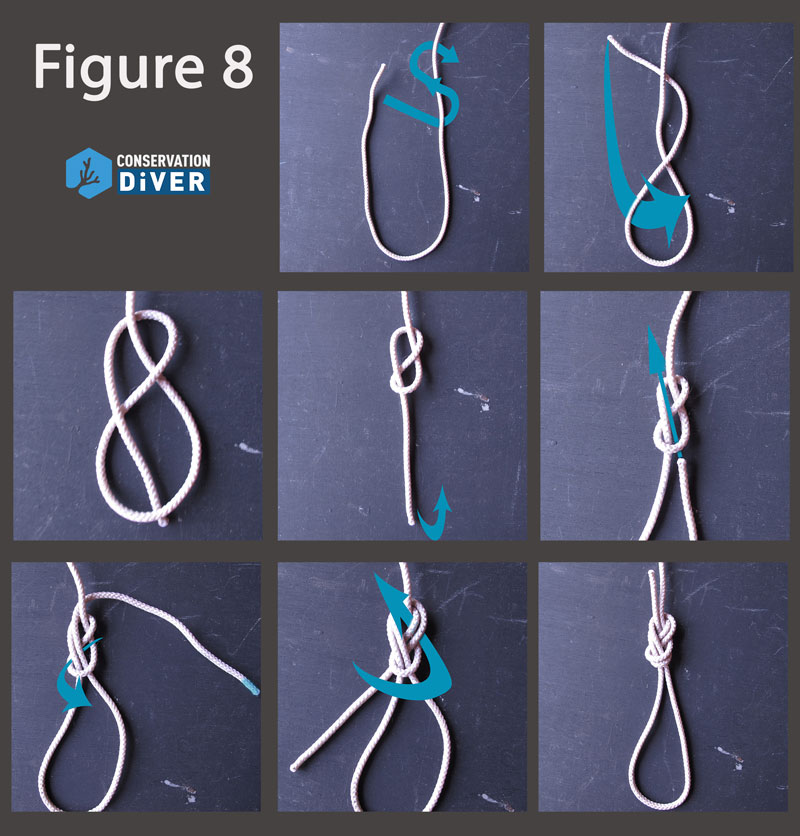
The Figure 8 Knot is a secure and dynamic alternative to the overhand knot and is almost as simple. Essentially it is the overhand knot with an extra twist in it. This twist eliminates the sharp turns of the overhand knot, which reduce the rope strength so severely, and also more easily facilitates (but not always) the ability to untie the knot after force has been applied to it.
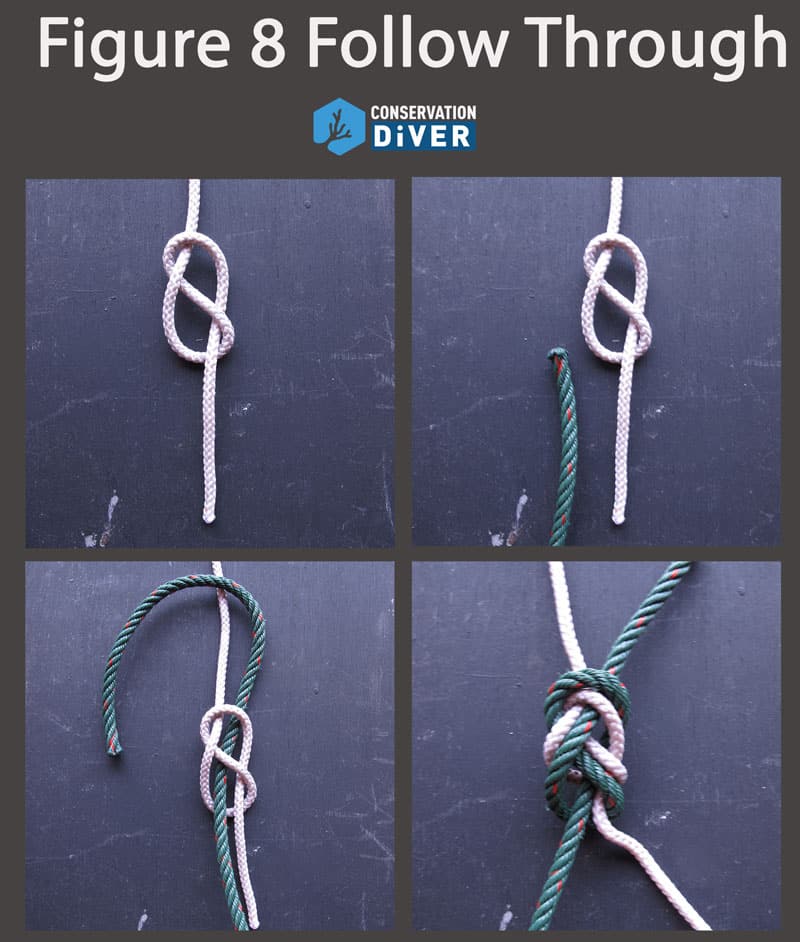
This knot can both be used to create loops in the rope (like the Bowline) or to attach two ropes together (but only if they are the exact same size, material, and degree of wear).
If two different sizes of rope are tied together with this knot, there is a good chance of the smaller or softer one slipping free. Also, the knot uses slightly more rope to create a loop than the Bowline so is generally not preferred. However, it is both easier to tie and easier to check if it was tied correctly than the bowline generally is.
Bowlines and Figure 8s on a Bight
‘On a Bight’ simply means doubled up and is used when you need to make a loop in a rope and do not have anything else to be tied in it (other loops can be integrated later using either knot typically). This can be used to create the loops at the swivel or at either end of the pick-up line. It is also possible to integrate vinyl tubing by placing it on the rope before the knot is tied.
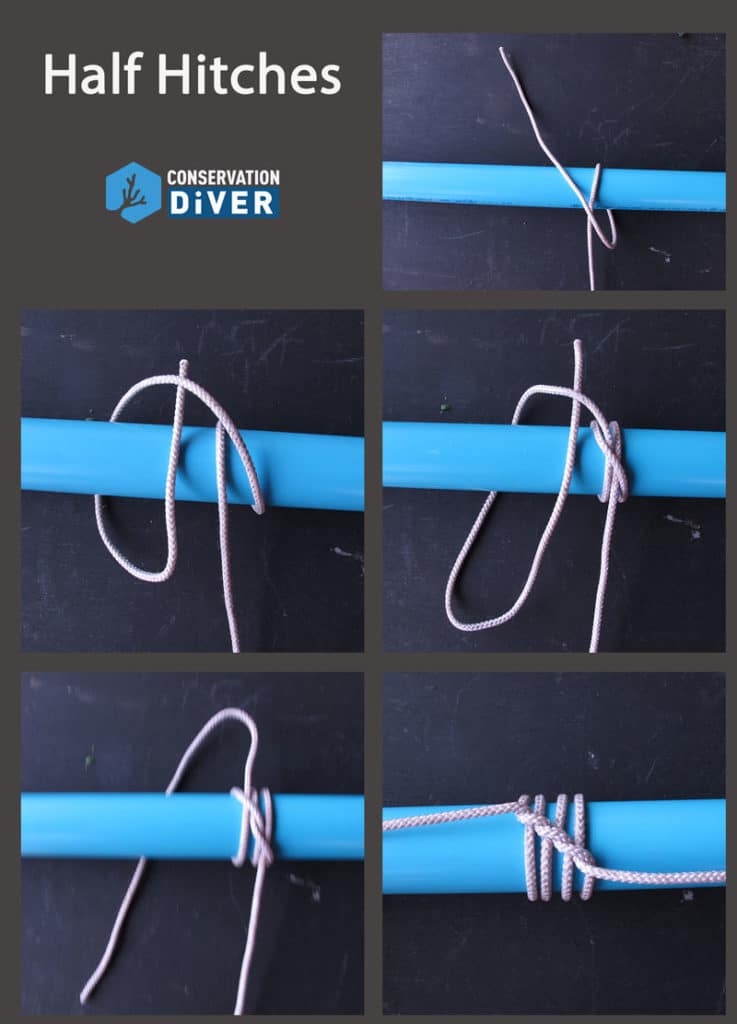
Half and Full Hitches
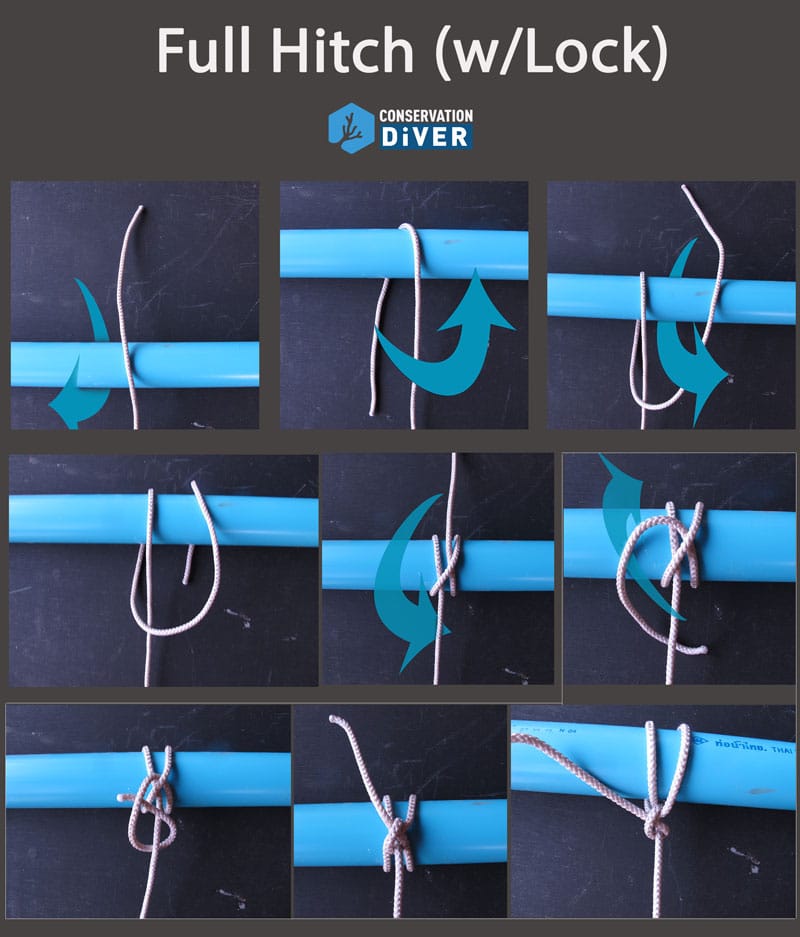
Hitches are some of the simpler knots and, in the case of mooring lines, are used to tie back-up knots with any extra rope, to tidy up old mooring lines, or to protect knots/ropes from abrasion.
They should never be used to tie the rope onto anything, as they are not very strong, are not dynamic, and are tedious or nearly impossible to get undone.
Now that you know all the basic parts and knots needed to tie mooring lines, these skills need to be practiced often, or they will be forgotten, so make it a bit of a game on the boat to tie them during down times or on surface intervals.
Installing and maintaining mooring lines is a vital skill for any diver, not just reef managers or conservationists. The use of anchors should really only be done in the deeper seas or in emergency situations. These days with all the money coming in from coral reef tourism, there is no excuse for anybody dropping anchors when they could be establishing mooring lines in the areas where they frequent instead.